Tuesday, March 29, 2016

Block of the Month - April Block

New Beginnings Block of the Month


This is no April Fool's joke - I've just added the April block to Craftsy and it is ready for digital download!!

Here is my fabric selection for this block. As you can see, I chose to use a light turquoise for the centre of the block instead of the off-white in the pattern. 


Once again, my little cardboard tags came in handy when I started cutting my shapes - it made it so much easier to keep track of what to sew to what!


Here is my finished block. I just love this one!!

April Block of the Month

There are now five blocks available in our Craftsy store. Be sure to check out our store and to download the FREE bonus block and the FREE General directions to see what our Block of the Month is all about.

At the end of the year, we will be offering two different pattern for finishing the blocks into a bed quilt.

Make sure to share pictures of YOUR finished blocks on Craftsy - for every block you add we will enter your name into our draw for a FREE quilt kit of one of our Northcott patterns!!


Friday, March 25, 2016

52 Week UFO Challenge - Projects #17 and #18 - Modern Wool Pillow and Tea Cozy

I've had these two wool pieces, unfinished, in my studio for so long that when I dug them out I couldn't remember what I was planning to do with them. I knew the one was supposed to be a tea cozy when finished, but the square piece could have been anything. I was obviously having fun with my Accuquilt Studio cutter and circle die one day, but for some reason I never even started to stitch these pieces.

I decided that the square piece would make an awesome pillow as it was about 16" square, so I got to blanket stitching all of the circles using my Razzle and Dazzle threads from WonderFil.
Blanketstitching done with Razzle and Dazzle threads
After the circles were all sewn, I used a blanket stitch all of the way around to secure the back of the pillow and then left a small opening to stuff with PolyFil.
Hole left for stuffing
 Here is the finished pillow! Wouldn't it be fun in a teenagers room?


The tea cozy was a bit more complicated to finish. Fist I blanket stitched all of the circles to the background.

 Next, I cut two pieces of batting about a 1/2" smaller (all around) than the wool background.


  I then used my 505 Spray to stick them to the back side of the fabric I wanted to use for my lining. Check out the hot pink!!

I used my walking foot to machine quilt a grid of lines through the batting and lining.


 I then sewed the two pieces of quilted lining right sides together along the curved edge, leaving a small unsewn section for turning.

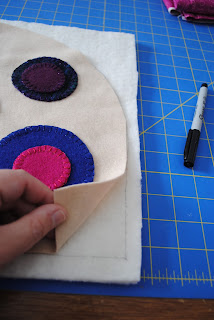
I placed the wool front and back together with right sides facing the sewed along the curved edge.


I turned the outside of the placemat right side out then placed it inside of the lining (with right sides together) and pinned them together. The next step was to sew the lining and the outside together with a 1/2" seam.


Then I had to pull the whole thing right side out through the hole in the lining, I stitched that hole closed and then top stitches around the opening of the tea cozy.


Here it is - all finished!!

These two items are available for purchase in my Fairfield Road Designs Etsy store. Check out these items and more at this link.

Tuesday, March 22, 2016

Great Tips for Tidying up Leftover Binding Strips

If you are like me, you just can't make yourself throw away extra binding that you may have from a project. And, if you are like me, then you keep all of these binding ends in a safe place, ready to be used in a future project. And, if you are like me, you FORGET to use any of the bindings in this safe place and they become a huge untamed mess. Well, NOT ANYMORE!!! Today I'm taming the binding beast!!

In my sewing room I have six little plastic boxes. One for leftover strips of fabric, one for 2" squares of fabric, one for 3" squares of fabric, one for 4 1/2" squares of fabric, one for flannel squares and one for extra pieces of binding. Whenever I am cutting out a project and I have a little left over fabric, I cut it into squares and put them in the appropriate bin. I've used these squares to make tote bags or other small scrappy projects. Since I've started my 52 week UFO Challenge I've made A LOT of binding and had lots of ends left over, but my binding bin was so full that I couldn't put anything else in.


The first thing I did was to THROW OUT any pieces that I knew I would never use. When I first started quilting I cut all of my binding 2" wide, but now I always use 2 1/2" strips, so I tossed all of the 2" wide ones into my scrap bin (which is also starting to overflow!).

The next step was to sort. I decided to make one pile of red bindings...


One pile of batik bindings...


One pile of country coloured bindings...


And one pile of navy bindings, one of brights and one that was all black fabrics. I randomly sewed the bindings in each pile end to end with a mitred join, pressed them and then wound them onto some pieces of cardboard to keep them tidy. Here is my collection of brights all ready for a fun kids quilt!!

Bright bindings wound on cardboard.
 I LOVE the way the red ones look! I can't wait to use them in one of my projects!


I could fit about four different bindings on each piece of cardboard. A pin the end of each binding will keep them from unravelling.


Here is my bin, all nice and organized!! I had a few pieces that just didn't fit in with any of my groupings so I left them on their own. Now that I know what I have in the box I'll be more apt to use them. And, now that the bindings are all sorted nicely, I can add new pieces to whatever grouping I want as I add them to the box. I LOVE it!!!


Saturday, March 19, 2016

52 Week UFO Challenge - Project #16 - Passion Planner Covers

A couple years ago I exhibited in an artists studio tour and had some quilted mini agenda covers for sale. I had these two pieces leftover and  decided to make some quilted Passion Planner covers.
Oriental pieced section

Country colours pieced section
My first step was to load the pieced units on my Gammill and quilt them. I also mounted a section of my Northcott "Ambiance" fabric as well. For the Ambiance, I decided to quilt spirals, and for the other two, I chose my leaves and swirls.

Spirals on the Ambiance fabric

Leaves and Swirls quilting design
 The next step was to trim the quilting pieces into rectangles  12 1/4" x 19". I was able to cut two rectangles from each of my quilted pieces to make a total of six Passion Planner covers.

Quilted rectangle.
 The next step was to cut rectangles of fabric to make the inside flaps of the covers. Each inside flap is cut 9" x 12 1/4" and then folded in half to make a rectangle 12 1/4" x 4 1/2". I then pressed each of these rectangles and then pinned two of them to the inside of each each of the planner covers, aligning the raw edges.

One flap pinned to the inside front of the planner.
 The last step was to sew binding to the outside edges of each of the planners and then to slip the Passion Planner inside! The two flaps on each end of the cover hold it in place and provide two pockets to keep important papers.

The first finished planner cover,

The inside of planner cover #2


I've added these planner covers to my Fairfield Road Designs Etsy store - check them out here. UFO project #16 is done!

Friday, March 18, 2016

Fabric goodies from Lancaster PA

I have the BEST business partner in the world!! Nellie went on the guild bus trip to Lancaster, Pennsylvania this week and look at all the yummy fabric goodies that she brought back for me!!
She is one AWESOME personal shopper - I can't wait to plan my next project using one of them.

All the loot!
Bee Creative jelly roll


Layer cake and charm packs

Wednesday, March 16, 2016

52 Week UFO Challenge - Project #15 - Stencilled Leaf Wall Hanging

Stencilled Leaves with Shiva Paintsticks

Over a year ago, Nellie and I took a surface design course with Elaine Quehl. We learned lots of techniques, one of which was using freezer paper stencils with Shiva Paintsticks

My UFO featuring Shiva Paintsticks stencilling.
We traced the stencils from Elaine's patterns and then cut them with X-acto knives. Using a stencilling brush, I filled in the stencils with both gold and green painsticks, blending them in the middle.
Close up of one leaf. 
 I trimmed the stencilled piece first and then picked fabrics for the inner border and outer border.

Once the borders were on it was time to mount it on the Gammill for quilting.

Quilt top ready for quilting.
 Here is a close-up of some of the quilting on the leaves. I outlined each of the leaves and then did some nested tear drops in the background.

Close-up of quilting
Here is the finished wall hanging. Project #15 is all finished!


Unfortunately, when I was looking for fabrics for the borders for the quilt I discovered MORE unfinished objects. Now my total is up to 49!! Good thing I have been working away at these projects faster than I first planned - 15 projects in 2 1/2 months is pretty good!!


Saturday, March 12, 2016

52 Week UFO Challenge - Project #14 - Wool appliqué heart candle mat

MORE hearts!!

I've said it before... I love wool hearts!!

I started this appliqué piece almost two years ago to do a wool appliqué demo at our local quilt shop. The hearts had been blanket stitched, so I added some embroidery stitches and cut a backing from another piece of navy wool.


Cutting a backing from another piece of navy wool.

I decided to add some buttons to the appliqué piece and that was just what was needed.

Sewing on the buttons.
 The final step was to blanket stitch around the edge of background in order to secure the backing.

The candle mat has been blanket stitched around the edge.
 Project #14 is complete!
The finished candle mat.