Friday, April 29, 2016

Machine Quilting Leaves and Swirls

52 Week UFO Challenge Project #22 - Disappearing Nine Patch quilt

Have you ever made a quilt that you just didn't like?? Even though I had purchased two charm packs of fabrics that I just loved, once I put them together into a quilt I just couldn't get motivated enough to finish it.

I finally decided that the reason that I never finished the quilt was that I really didn't like it. BUT after looking at it critically one day I realized that it was only the OUTER BORDER that I didn't like.

When I had finished the top at our quilt retreat, I had a brown fabric on hand that I used for the border, but I'm not really a "brown" person. I probably have no more than six brown fabrics in my entire stash and I'm really not drawn to them. 

Once I decided that the outer border had to go, I found a blue one that I liked and got to sewing. The resulting quilt top was SO much better!!!

Disappearing nine patch quilt with the new blue border

I loaded the quilt on my Gammill and decided to use a leaf and swirl design to quilt both the border and the centre of the quilt.


Leaf and swirl design

Here is the finished quilt - not bad for a quilt that I had never wanted to finish!! Machine quilting leaves and swirls is one of my favourite motifs to use on a variety of quilts. I'm so glad that I persevered and finished this quilt! UFO #22 is done!!


Wednesday, April 27, 2016

Modern Squares baby quilt

52 Week UFO Challenge Project #21 - Leftover squares made into a baby quilt

A couple years ago I went on a baby quilt making spree and ended up with five different baby quilts for expecting co-workers and friends. I also ended up with some leftovers - of course LOL.

I LOVED using the Twister Tool ruler to make a couple of the baby quilts, but for each quilt, after  I used the tool to cut the tessellated blocks I ended up with a bunch of 5" bias squares of fabric. 

The Twister Tool and my left over sqauers

I decided to use the squares to make another baby quilt.

First step was to trim the squares so that they were all exactly the same size. I added a few more squares to make up the right number for the quilt.

Next I cut sashing strips from white fabric and sewed one to all but eight of the squares.

Chain piecing the sashing strips to the squares.
I sewed these together into eight rows and then added one of the left over squares to the end of each row. I then added a sashing strip in between each of these rows. 

When sewing rows like these together, it's important to make sure that the small sashing strips are lined up correctly.


One the rows were all sewn together, I added a white border to all four sides.

Adding the border

I decided to quilt it using wavy lines that travelled the entire length of the quilt. I lived this design as it was simple to do and added to the modern feel of the quilt. I used cozy Northcott flannel for the backing!!

Wavy quilting lines

Once the quilt was finished, I decided to put it up for sale on my Fairfield Road Designs Etsy shop. To my delight it was bought by a woman in Australia!! Such fun to be part of a global economy!!


Project #21 in my UFO Challenge is finished - and my Modern Squares baby quilt is en route to Oz.

Tuesday, April 26, 2016

Tortilla Soup - Thrive Style

Today I decided to FINALLY make Chef Todd's Los Cabos Tortilla Soup and I have to say, it was DELICIOUS!

Tortilla Soup from Thrive

The first time I ever had Tortilla Soup was in Houston at Quilt Market. We stayed at the Convention Centre Hilton and this soup was their speciality. I've had it a few times since, but none were as good as the one at the Hilton. 

This recipe though is pretty close! And super easy! And FAST! 

First of all I made a "meal in a jar" with the recipe. I added Thrive Sweet Corn and a bit more chilli powder to my version.

My Thrive ingredients 

Once all of the ingredients were in the jar, all I had to do tonight was to add the water and simmer for about 25 minutes. To serve, we filled our bowls with the soup, added crushed tortilla chips, grated cheese and a dollop of sour cream. 

The resulting Tortilla Soup (Thrive Style) was AMAZING!  Check out my Thrive website for this and MANY more recipes. 


Saturday, April 23, 2016

Quilting maple leaves from the backside

52 Week UFO Challenge - Project #20 - Celebrate Canada quilt

At our retreat in February I put together a sample of the "Our Native Land" quilt from our book "Celebrate Canada".

This quilt was super fast and fun to put together and I still just LOVE the Oh Canada fabrics from Northcott. Now that I'm back from my trip, and have a bit of time to spare, I've finally been able to get it quilted!!


I wanted to quilt a maple leaf design on the quilt, so I decided to use a pantograph that I had on hand. I don't often use pantographs for one simple reason - space. My Gammill is located in a long, skinny sun room off the back of our house and when the Gammill is pushed right back, it just barely clears the opposite wall. So standing behind it, to quilt a pantograph is "almost" impossible.


So, I decided to try stitching the pantograph while standing to the left side of the machine. I had to hold the left hand button in my right hand, and use my left hand to help steer by holding onto the body of the machine. By doing this, I was able to keep an eye on the laser pointer as it followed the design on the pantograph.


 The end result turned out AWESOME - although I think I might need to go for a back massage after stitching in that position for the hours that it took to finish the quilt!!


One of the risks of stitching from the back of the machine is that you aren't watching the FRONT of the machine - can you see where I missed stitching a maple leaf???


Luckily, I noticed while the quilt was still on the machine so that I could go back and add the missing leaf. My quilt turned out just lovely and I just LOVE the maple leaf quilting!!


Twenty projects done for my 52 week challenge!! Turns out that quilting maple leaves from the backside isn't so hard after all and I'm so pleased with my quilt. 


Monday, April 18, 2016

Machine Quilting an Inktense Wallhanging


52 Week UFO Challenge - Project #19 - Hibiscus Wallhanging

After Nellie and I took our Surface Design course with Elaine Quehl I played around a bit with one of my new tools - super fun Inktense Pencils.

One of the projects I experimented with was this Hibiscus. The first thing I did was to find a few pictures online such as this one:


Using this picture as a guide, I outlined the general shape of the flower and then started shading in with my Inktense Pencils . After all of my colours were set down, I covered my cutting board with a large plastic bag and then started spraying the fabric with water. The colours then intensified and started to bleed into the surrounding areas - you can see that the pink travelled quite a bit into the green background.


Although I loved using the Inktense pencils and the finished result, I wasn't sure how to finish it off until now!

The first step was to add some borders, so I picked a pink batik for the inner border and a green leaf print for the outer border.

After loading it onto my Gammill, I needed to pick some threads to do some thread painting. I LOVE, LOVE, LOVE my variegated King Tut Threads from Superior Threads.

Green threads for the leaves and background.
Orange and fushia threads for thread painting the flower.


I started with the flower, by outlining the petals with a darker thread and then using some of the lighter threads to add dimension.
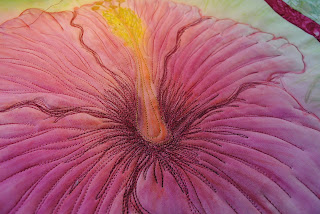
Close-up of the flower centre.


The background and borders were next. Here is the finished product! Project number 19 is done and hanging on the wall! I can't wait to use my Inktense Pencils again!!! Machine quilting over top of the Inktense design just makes it come alive!!


Saturday, April 16, 2016

Cross Canada by Train

Two summers ago Mike and I took the train from our hometown of Brockville to Halifax Nova Scotia. The scenery was amazing and our time down East was lovely.

Ever since then, Mike has wanted to take the train to British Columbia. He had never been more west than Thunder Bay and had never seen the mountains! It was definitely on his "bucket list" to get to the West Coast by train.

He wanted to take the train both ways, but with it being a 4 day trip, I convinced him to conquer his fear of flying and to fly to Vancouver and take the train back to Brockville. It took A LOT of medication to get him on that plane, but once we were on our way, he was just fine!!

While in Vancouver, we took in the sights of Stanley Park, Granville Island (where I even found a quilt shop!), Gastown and the Capilano suspension bridge.

Gastown Clock

The Olympic Cauldon

The flowers at Stanley Park
Totem poles at the Capilano suspension bridge

We boarded the train on Friday night at 8:30pm and woke up the next morning in Kamloops. By that afternoon we were in the mountains!!


Pyramid Falls


Sunday morning brunch (and all the other meals) was amazing!! And during the four days I had ample time to read, play games on my iPad and OF COURSE, do some stitching!!

Eggs Benedict for Sunday brunch 

Hand stitching on the train


 Now that we are back home, it is back to work for me!! But if you have the chance to see this beautiful country by train, we HIGHLY recommend it!!


Saturday, April 2, 2016

52 Week UFO Challenge - Project #19 - Nautical Baby Quilt

Back before Christmas a co-worker commissioned me to make a baby quilt for her best friend, She knew that the nursery was going to be decorated with a nautical theme, so she asked if I could make the quilt to match. I looked EVERYWHERE for jeuvenile nautical fabric and found nothing!! Finally I found a white/navy/red/medium blue striped fabric that I thought would work (if only for the backing). It couldn't decide what to do with it until one day I was looking on Pinterest and saw a sailboat block - I figured out how the block was assembled and then got to work cutting!!

I found some co-ordinating fabrics in my stash and then used my Accuquilt Studio Cutter and the 3" Half Square Triangle Die to cut them into triangles for the sails on the boats.


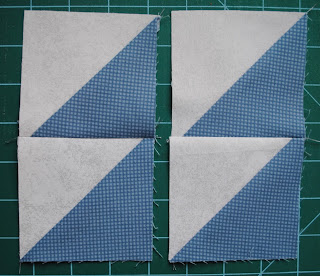
For each boat block I sewed four coloured triangles to four white triangles as shown.


I cut 3 1/2" x 6 1/2" strips of the white fabric and sewed one to each side of the sail sections.


Used my Frixion pen to mark a line on the back of two white 3 1/2" squares and then aligned these onto one 3 1/2" x 12 1/2" rectangle of the striped fabric, right sides together.


I then sewed along the drawn line and then cut off the excess fabric. 

I then pressed the unit and sewed it to the bottom of the sail section and then sewed a 3 1/2" x 12 1/2" rectangle to the bottom of the block to create the water.


I sewed these four sailboat blocks together in a row and then added stripes of the other fabrics in varying widths.


My friend, the new mom and baby Colton all loved the quilt and so did I. Project #18 checked off my list!! Here is Colton and his new quilt. What a little cutie!!