Saturday, December 31, 2016

Finishing up the 52 week UFO challenge

52 Week UFO Challenge Projects #41-#44

Well, my 52 week UFO challenge has come to an end and I'm proud to say that although I didn't get all 52 projects done, I did complete 44 of them!! I've outlined projects #1-#40 throughout the year and here are the final four projects:

Candy cane punchneedle candle mat which was featured in last month's Primitive Quilts & Projects magazine:


Flower and bee applique block finished into a wall hanging:


Leftover quilt blocks made into a modern baby quilt:


Fairy applique block finished into a small wall hanging:


Thanks for joining me on my 52 week challenge!! I've had lots of fun making my way through all of these UFO's and have a great sense of accomplishment looking back at all of the projects that I've finished this year!!

Happy New Year!!!

Wednesday, December 28, 2016

Making quilted pillow covers with leftovers

52 Week UFO Challenge - Project #40

A couple years ago I bought the most amazing fat quarter bundle of Japanese fabrics from Kallisti quilts when she had a booth at the Ottawa quilt show. I've made a few projects from this bundle of fabrics, including a table runner made with hand pieced hexagons and a lap quilt made with hexagons and triangles all cut with my Accuquilt Studio cutter.


But I LOVE this fabric so much that I didn't want to waste ANY of it, so the scraps that were left from the previous project were all cut into small triangles using my Accuquilt triangle die.


I sewed them all into rows of 12 triangles each:


And used little half-triangles on the ends of the rows to make them square:


I then sewed all of the rows together and found that I had enough rows to make two square pieces that were each 17" x 17" - just big enough to make the fronts of pillow covers!


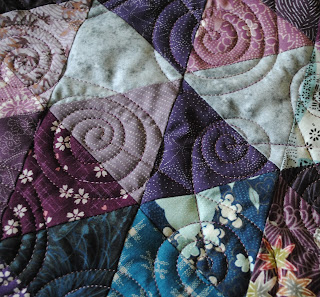
I layered them with batting and backing and quilted one with a spiral design and one with a leaf design:


I then followed the directions that I gave on my quilted pillow post on June 5th to make them into pillow covers. I LOVE them!! And have officially used up EVERY scrap of that fat-quarter bundle!!

Project #40  is done!!


Monday, December 26, 2016

Experimenting with WonderFil Threads

Happy Boxing Day!!

I can't believe that Christmas is over for another year! Today we are spending the day relaxing by the fire, watching movies and enjoying the gifts that we received yesterday from our family. Tonight is turkey soup night at the Baker's and tomorrow turkey pot pie (my favourite)!!

This week I am guest blogging on QUILTsocial and once again I am experimenting with WonderFil threads. This week I am using their Eleganza threads to do some wool applique, embroidery and sashiko!! What a nice treat to do some hand stitching after the busy times leading up to Christmas!

Here are some of the previous projects that I have made for QUILTsocial using WonderFil's threads - hope you find something that piques your interest or inspires you to experiment too!!


Tablerunner using WonderFil's Razzle and Dazzle threads:


Hexagon "Back Porch Pillow" with Fruitti threads:


Fall fusible web tablerunner with Mirage and Decobob threads:


Christmas Tree wall hanging with WonderFil's metallic threads:


As you can see I've had lots of fun in the past experimenting with WonderFil threads - please join me on QUILTsocial this week as I explore more ways to use these wonderful threads!

Thursday, December 1, 2016

Final New Beginnings Block of the Month block now available on Craftsy

December block now available!

I can't believe that December is finally here! It has been a great year full of creativity for me and I'm so happy to share with you my final (and maybe favourite) block for our New Beginnings block of the month program.

The December block ePattern is now available for download from Craftsy.


I managed to keep track of my cardboard markers ALL YEAR LONG and they are still super helpful for keeping track of what fabric is what when I get to the sewing machine


My finished block looks awesome and I'm so looking forward to getting all of these blocks together in my quilt.


In a couple weeks we'll be posting two different patterns that can be used to sew all of your BOM blocks into a quilt!!

Wednesday, November 23, 2016

Have you submitted YOUR blocks??

New Beginnings Blocks

Our New Beginnings BOM for 2016 is almost finished and now we are looking forward to the year end draw!!

It's not too late to download the patterns and to enter your finished blocks into the draw. We will be picking the name of one lucky quilter who will win a kit for one of our Northcott quilt patterns!!

Kathy S. from Winnipeg, Manitoba only started working on her blocks in September but last night she submitted all of these blocks and got her name put into the draw EIGHT TIMES!!


I just love that polka dot fabric and I can't wait to see which finishing pattern she decides to use to make the blocks into a quilt!

The patterns for both of the finished quilts are just being written now and will be posted in December!


Saturday, November 12, 2016

The Canadian Sampler quilt

A few months ago Sew Sisters quilt shop asked us if we would design a couple blocks for their Sesquicentennial quilt project "The Canadian Sampler". We designed our blocks, made them and then mailed them to Sew Sisters along with the instructions. And yesterday we received an email with a picture of the completed quilt.


The quilt is made entirely with Northcott's ColorWorks fabrics in Cardinal and Winter White and is a combination of traditional and modern blocks. Sew Sisters is running it as a block of the month starting in January. 
This is the link to the registration: http://bit.ly/2fIPrxC


This is the link to their blog with the info on all of the designers. http://bit.ly/2fEmJPq

Wednesday, November 9, 2016

New quilt pattern now available


Savile Diamonds now available

Nellie and I have been so busy since returning from Houston! This morning though I was able to find some time to get one of our newest patterns up onto our website and onto Craftsy. Here is Savile Diamonds:

Savile Diamonds pattern by Upper Canada Quiltworks
Savile Diamonds - blue version
Savile Diamonds - brown version

This one is a "manly" quilt as it uses Northcott's new flannel line of plaids prints called "Savile Row". and our pattern gives directions for both colorways. But look what happens when I use the magic of EQ to try out some other fabrics:


As you can see - it gives it a whole new look!!! If you've got a focus fabric that you would love to use in a quilt, give this pattern a try!!

Look for it on our website: Savile Diamonds

Or on Craftsy: Savile Diamonds


Monday, November 7, 2016

Sewing adorable wool felt animals

 Leisure Arts recently sent me the cutest book to review - "Crafty Critters" by Vickie Clontz of Annie's Keepsakes.


This fun little book has patterns for purses and pincushions, coasters and magnets and lots more projects. The directions are well written and easy to follow.

The hedgehog pin cushion is my absolute favourite! Look how cute it is with pins sticking in it!


If you've got an outdoorsy little girl on your Christmas list, there are two adorable purse patterns - this little fox purse and a raccoon one too!


This book is available in print or as a ebook right from the Leisure Arts website or look for it at your local bookstore or craft supply store! Have fun sewing up a zoo full of adorable wool felt animals!

Saturday, November 5, 2016

Turtle Hand Batiks from Malaysia

Nellie and I attended International Quilt Market in Houston, Texas last weekend and we came home with many, many treasures and so, so inspired!! This year we found Quilt Market to be even more "International" than ever before. There were vendors from the US, Canada, Australia, Britain and many, many more countries. We came home with wool embroidery kits from France, the cutest buttons EVER from Brazil and my personal favourite, beautiful Turtle Hand Batiks from Malaysia.

We stopped in Tina's booth to admire her fabrics and ended up working out a way that we could partner with her to help promote her wonderful business! Tina imports these one-of-a-kind hand painted fabrics from families in Malaysia and follows ethical trade practices to help these artisans to make a better life for themselves. 


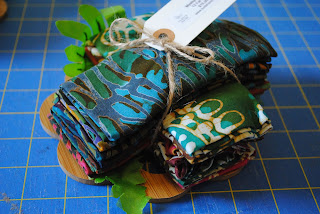
I managed to bring a few pieces home with me to see what I could create for Tina. One of her ladies made these fat eighth bundles secured on a trivet so I HAD to bring a couple of them home!

Fat eighth bundle from Turtle Hand Batiks


Tina's most amazing fabrics are her art panels like this dragonfly panel that I brought home with me. They are all beautifully made and the colours are so saturated!!

Dragonfly art panel all ready to be made into a quilt or bag
 Her line of fabrics has quite a selection of colours and designs! She sent us home with one of her swatch packs to help get the creative juices flowing.


Check out these hand made buttons from one of her suppliers - a husband and wife team that make buttons from coconut shells after the juice and meat has been consumed. What an awesome way to recycle!!

Hand made coconut shell buttons from Turtle Hand Batiks
Hand made coconut shell buttons

Needless to say that Nellie and I are super excited to be working with Tina and can't wait to start creating with our samples of Turtle Hand Batiks from Malaysia!!


Tuesday, November 1, 2016

November block of the month now available on Craftsy

New Beginnings BOM - November

Wow - it's November and we are almost at the end of our New Beginnings BOM  series!! If you've been following along, make sure that you post pictures of your finished blocks on Craftsy so that you can be entered into our draw for a quilt kit!!


Here are the fabrics that I chose for my November block. I'm just loving the navy, teals and orange/fuschia fabrics together and can't wait to see what all of my blocks are going to look like together!


Here are all of triangles ready to sew together:


And here is my finished block!!


Check out all of the New Beginning blocks that are available on Craftsy! Next month we'll post the final block AND two different patterns for using the blocks to make a quilt!

Wednesday, October 12, 2016

Making a quilt as you go (flip and sew) striped tote bag

52 Week UFO Challenge - Project #39


After finishing my Flying Geese quilt for QUILTsocial I had a whole pile of leftover striped fabric (that I had trimmed away from the flying geese). There was NO WAY that I was going to throw them out, so I had to find a project to use them in.


The quilt-as-you-go method can be used for all types of projects, but I like to use it most for small items such as table runners, place mats and tote bags.
For this bag we aren't going to have any batting, so it's technically not a "quilt", but the same technique and steps are used.

I'm using a medium weight interfacing to "quilt" on. This will give the bag some stability, but won't make it really heavy.

The first step is to draw a straight line across the interfacing. I like to do this line on an angle so that it's not as noticeable if some of my strips down go down perfectly straight. Next you lay down one strip of fabric right side up along this line and you keep adding strips until you have covered the entire piece. In my picture I have already sewn a few strips to the interfacing but you can see that they are on an angle and the seams are nice and straight.


The next step is to place your next strip on top RIGHT SIDE DOWN and pin in place with one raw edge lined up along the edge of the strip underneath.


 You sew your seam through all three layers and then FLIP your strip over and press.


You then add your next strip and pin, sew, flip and press. 


I alternated one striped strip and then one plain blue strip.


I had one flying gees strip left so I used it for the front of the bag.

The next step was to trim the two sections so that they were the same size.


I used some of my Northcott fabrics to make a lining for the bag and some of the leftover black polka dot fabric to make handles.


Here it is - the finished bag!

Well, that was a great use for my little striped strips of fabric!! This is all I had left from my pile:


The quilt as you go (flip and sew) method is super easy for making quilted items. Try it out with some of your leftover strips of fabric. I'm happy to say that another UFO is complete. I've got this little bag for sale in my Etsy shop - check it out at fairfieldroaddesigns.