52 Week UFO Challenge - Project #19 - Hibiscus Wallhanging
After Nellie and I took our Surface Design course with Elaine Quehl I played around a bit with one of my new tools - super fun
Inktense Pencils
.
One of the projects I experimented with was this Hibiscus. The first thing I did was to find a few pictures online such as this one:
Using this picture as a guide, I outlined the general shape of the flower and then started shading in with my
Inktense Pencils
. After all of my colours were set down, I covered my cutting board with a large plastic bag and then started spraying the fabric with water. The colours then intensified and started to bleed into the surrounding areas - you can see that the pink travelled quite a bit into the green background.
Although I loved using the Inktense pencils and the finished result, I wasn't sure how to finish it off until now!
The first step was to add some borders, so I picked a pink batik for the inner border and a green leaf print for the outer border.
After loading it onto my Gammill, I needed to pick some threads to do some thread painting. I LOVE, LOVE, LOVE my variegated
King Tut Threads
from Superior Threads.
 |
| Green threads for the leaves and background. |
 |
| Orange and fushia threads for thread painting the flower. |
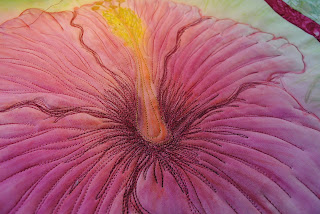
I started with the flower, by outlining the petals with a darker thread and then using some of the lighter threads to add dimension.
 |
| Close-up of the flower centre. |
The background and borders were next. Here is the finished product! Project number 19 is done and hanging on the wall! I can't wait to use my Inktense Pencils again!!! Machine quilting over top of the Inktense design just makes it come alive!!
 .
. . After all of my colours were set down, I covered my cutting board with a large plastic bag and then started spraying the fabric with water. The colours then intensified and started to bleed into the surrounding areas - you can see that the pink travelled quite a bit into the green background.


 from Superior Threads.


No comments:
Post a Comment